Angular.js 基于JSON Token的认证
https://auth0.com/blog/2014/01/07/angularjs-authentication-with-cookies-vs-token/
简介
实现服务器认证有两种基本的方法:
- 采用最多的一中方法,
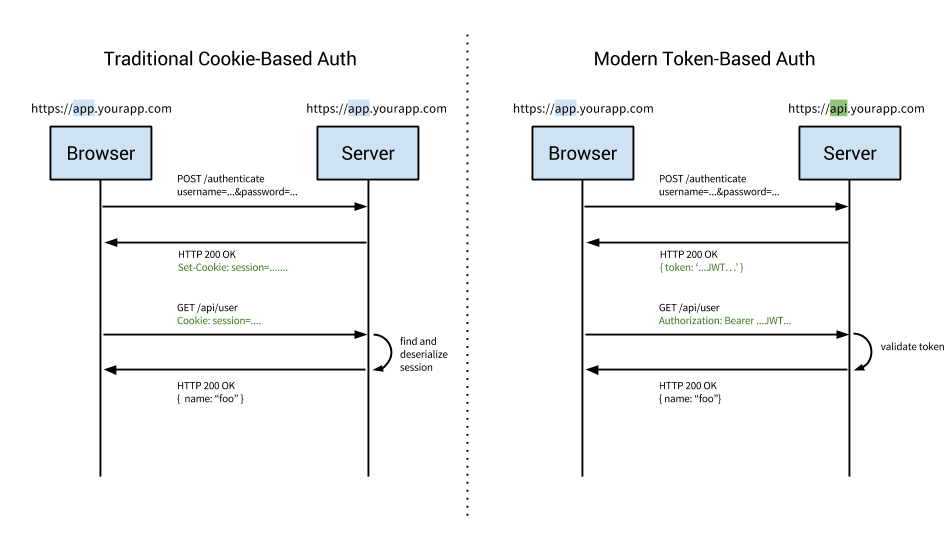
基于Cookie的认证(你可以在这里找到例子), 每次请求时,其采用服务器端Cookie认证用户 - 一个新方法是
基于Token的认证. 依赖于一个每次请求时向服务器发送一个签名的Token.
基于Token vs. 基于Cookie
下面的视图解释了这两种方法是如何工作的.

使用基于Token的方法有什么好处?
- Cross-domain / CORS cookies + CORS don’t play well across different domains. A token-based approach allows you to make AJAX calls to any server, on any domain because you use an HTTP header to transmit the user information.
cookies + CORS在跨域的时候工作的不够好.基于Token的方法可以向任何服务器发起AJAX请求 - 无状态
- CDN
- 解耦
- Mobile ready
- CSRF
- 性能
- Login page is not an special case
- 基于标准的
实现
假设有一个node.js应用程序, 在下面可以发现此构架的组成部分.
服务器端
首先安装express-jwt和jsonwebtoken
1 | npm install express-jwt jsonwebtoken --save |
配置express中间件保护对/api的所有请求.
1 | var expressJwt = require('express-jwt'); var jwt = require('jsonwebtoken'); // We are going to protect /api routes with JWT app.use('/api', expressJwt({secret: secret})); app.use(express.json()); app.use(express.urlencoded()); |
angular应用程序通过Ajax把用户凭证POST给服务器:
1 | app.post('/authenticate', function (req, res) { //TODO validate req.body.username and req.body.password //if is invalid, return 401 if (!(req.body.username === 'john.doe' && req.body.password === 'foobar')) { res.send(401, 'Wrong user or password'); return; } var profile = { first_name: 'John', last_name: 'Doe', email: 'john@doe.com', id: 123 }; // We are sending the profile inside the token var token = jwt.sign(profile, secret, { expiresInMinutes: 60*5 }); res.json({ token: token }); }); |
获取一个名为/api/restricted的资源. 注意凭证的检查是由expressJwt中间件处理的.
1 | app.get('/api/restricted', function (req, res) { console.log('user ' + req.user.email + ' is calling /api/restricted'); res.json({ name: 'foo' }); }); |
Angular端
在客户端的第一步是使用AngularJS获取JWT Token. 为此需要一个用户凭证. 创建一个包含表单的视图, 用户可以在这个视图中输入用户名和密码.
1 | <div ng-controller="UserCtrl"> <span></span> <form ng-submit="submit()"> <input ng-model="user.username" type="text" name="user" placeholder="Username" /> <input ng-model="user.password" type="password" name="pass" placeholder="Password" /> <input type="submit" value="Login" /> </form> </div> |
以及一个控制器处理提交动作:
1 | myApp.controller('UserCtrl', function ($scope, $http, $window) { $scope.user = {username: 'john.doe', password: 'foobar'}; $scope.message = ''; $scope.submit = function () { $http .post('/authenticate', $scope.user) .success(function (data, status, headers, config) { $window.sessionStorage.token = data.token; $scope.message = 'Welcome'; }) .error(function (data, status, headers, config) { // Erase the token if the user fails to log in delete $window.sessionStorage.token; // Handle login errors here $scope.message = 'Error: Invalid user or password'; }); }; }); |
现在有了一个保存在sessionStorage中的JWT. 如果Token已经设置,那么对于每次发出的请求,将会使用$http服务器去设置一个Authentication请求头. Authentication的值设置位Bearer <token>
sessionStorage: 虽然没有在所有浏览器上都支持(你可以使用polyfill),这是一个不错的注意来取代cookies($cookies,$cookieStore)和localStorage: 数据一直存在到浏览器标签关闭.
1 | myApp.factory('authInterceptor', function ($rootScope, $q, $window) { return { request: function (config) { config.headers = config.headers || {}; if ($window.sessionStorage.token) { config.headers.Authorization = 'Bearer ' + $window.sessionStorage.token; } return config; }, response: function (response) { if (response.status === 401) { // handle the case where the user is not authenticated } return response || $q.when(response); } }; }); myApp.config(function ($httpProvider) { $httpProvider.interceptors.push('authInterceptor'); }); |
然后,发送一个请求到限制访问的资源:
1 | $http({url: '/api/restricted', method: 'GET'}) .success(function (data, status, headers, config) { console.log(data.name); // Should log 'foo' }); |
然后服务器输出日志到控制台:
1 | user foo@bar.com is calling /api/restricted |
源代码在这里, 以及一个AngularJS seed应用程序.
接下来的事情
- 如何处理第三方登陆
- 如何处理会话超时